What Are Content Upgrades?
A Content Upgrade is a specific type of Lead Magnet designed to be highly relevant to the content the visitor is currently consuming, and thereby achieve higher conversions.
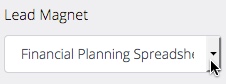
For example, the visitor might be watching a video about financial planning. The content upgrade might be a free spreadsheet that will help them implement the advice...
Or they might be reading a blog post on travelling in Nicaragua. The content upgrade might be a free checklist of essential travel items and vaccinations.
Obviously the content upgrade offered completely depends on your industry and the type of content you publish.
Because content upgrades directly relate to the piece of content the visitor is consuming, conversion rates are often significantly higher than normal. That's why they're now a key lead capture strategy.
The good news is that optinopoli™ has been expressly designed to make it super easy to offer content upgrades. You can even run Smart Campaigns to new leads to build your relationship with them through personalized engagement and convert them into buyers. Here's how...

Where Can You Use Them?
Content upgrades can be offered on your website, including on your blog and any other content pages.
You can use them on other sites too ... You might have:
- Videos on YouTube
- Updates on social media
- Articles on Medium
- Answers on Quora
- Slideshows on Slideshare
- And so on ...
You can use content upgrades to capture leads from your audiences on these other sites too—optinopoli™ makes it super easy.
An effective content upgrade strategy can help you capture thousands of new leads.
Discover how optinopoli™ makes it easy—and how to run follow-on Smart Campaigns that build relationships and sales through personalized engagement...
How to Use optinopoli™ for Content Upgrades
With optinopoli™, it's a breeze to implement and manage multiple content upgrade campaigns across your website and elsewhere for higher lead conversions.
Content upgrades don't have to involve downloadable files, but this is generally how they work. Use optinopoli™ to manage these files and facilitate easy downloading of them by new leads. Content upgrades and other lead magnets are distributed via our high-performance CDN.
It means there's no need for separate autoresponders for each content upgrade in order to deliver the downloads. That can otherwise become very time-consuming and cumbersome to manage.
With optinopoli™, you can choose for leads to optionally download the relevant content upgrade as soon as they provide you with their details.
Here's how to start offering content upgrades ...

01
Click to add a new Lead Magnet
For each new content upgrade, add a new Lead Magnet to your account.
Click Lead Magnets from the sidebar and then the Add New Lead Magnet button.
Or just click here.
02
Select type
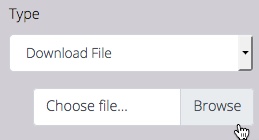
For a downloadable file, ensure Download File is selected in the drop-down, choose a file, and upload it.
(To see the actual download link in our CDN, save the Lead Magnet first, and then go back to edit it. You'll see the link provided. Right-click on it to copy it and use elsewhere.)
Otherwise, select the Web page option, and enter the URL where your content upgrade is available. For example, it could be a page offering some free videos.
03
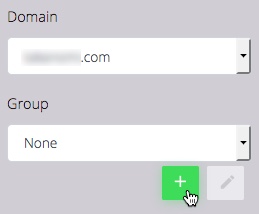
Add a Lead Magnet Group
Ensure the correct domain is selected, reflecting the website where you want to offer the content upgrade.
You might offer several content upgrades, and want to run follow-on Smart Campaigns for new leads to further engage them and move them further along your sales funnel.
To group together content upgrades in this way, assign a Group to them.
It means that, using the Smart Campaign settings, you can determine that as soon as one of the content upgrades in the Group attracts a new lead, all the other content upgrade campaigns in that same Group stop running for that visitor.
You can then run follow-on Smart Campaigns for new leads, increasing your sales conversions and revenue. For example, you might then offer them a whitepaper or invite them to a sales webinar.
(Don't worry... even when a campaign is stopped in this way, the visitor can still click any link triggers you have provided—see Step 12— to request the content upgrade).
04
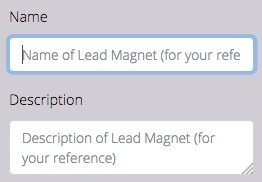
Enter name and description
Enter a name to identify the content upgrade when you create campaign(s) for it, along with an optional description.
05
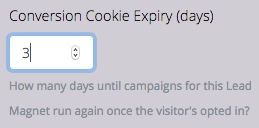
Set conversion cookie expiry
The Conversion Cookie Expiry setting determines when campaigns for the content upgrade will start running again for a visitor once they have become a lead.
Note that when using follow-on Smart Campaigns, they will take precedence over this setting. That means relevant Smart Campaign(s) will run instead of any campaigns listed in their Has opted into... setting. See the information on Smart Campaigns for more info.
06
Set a default image
Upload an image of the content upgrade (such as an ebook, report cover or video image) to be used when creating the associated campaign(s).

07
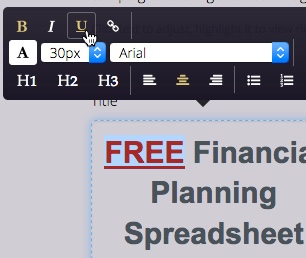
Create default copy
Via the Copy tab, create some default copy to be used to offer the content upgrade to visitors.
This means different campaigns for the content upgrade are very quick to launch.
For example, you might have a Lightbox running on a blog post that offers the content upgrade, and a link to a Landing Mat if the blog post has been repurposed for another content channel like Medium, YouTube or SlideShare.
The copy can be adjusted as required within each campaign.
08
Save content upgrade
Adjust the notification and integration settings via the Notifications and Integrations tabs. See the information on Lead Magnets for more information about doing this.
Save the content upgrade Lead Magnet. You can now use it to create a campaign, as follows.


09
Click to add a new campaign
Click Campaigns from the sidebar and then the Add New Campaign button.
Or just click here.
10
Select the content upgrade
From the Lead Magnet drop-down, select the relevant content upgrade.
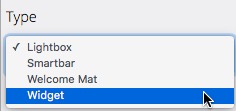
Set the other options on the General tab as required. To start with, leave the selected Type as Lightbox. The Goal will of course be Lead Capture.
Similarly, adjust the settings on the Styling and Effects tabs as required. See the information on launching a new campaign for more information about these settings.
11
Content upgrade delivery
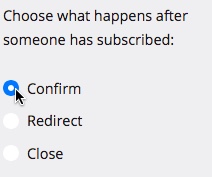
To determine how new leads will access the content upgrade after entering their details, choose one of the following options from the Success tab:
- Confirm: Style the confirmation box as required. To enable new leads to access the content upgrade immediately, ensure the Download Button - Display? option is on.
- Redirect: Copy the download link for the content upgrade as described in Step 02 above. Click the Redirect option on the Success tab and paste the download link into the Page URL field. Alternatively, enter a link to your own thank you page here that either shows the download link and/or starts the download.
12
Get the link code
Add one or more links on the content page (e.g. the blog post) to offer the content upgrade to visitors.
When the link is clicked, the Lightbox will show, inviting the visitor to enter their details in order to get the content upgrade.
(Note a click on a link is just one Trigger Rule to show the Lightbox. You can add other Trigger Rules too in the next step to increase conversions).
In order to get the required link code, first save the campaign (e.g. as a draft). Then return to the campaign and go to the Display Rules tab.
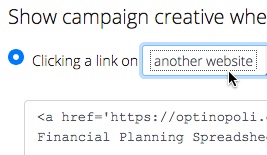
Click Add Trigger Rule and select the Clicking a link... option.
Choose whether you want a link to go on your website, or a third-party website (e.g. to offer the content upgrade via another content channel like YouTube).
Copy the link code provided and paste to where you'll be showing the link. Click the Add Trigger Rule button to save.

13
Add Other Trigger Rule(s)
You'll increase lead conversions by adding other Trigger Rules for your campaign.
This means visitors will be offered the content upgrade, even if they don't click the link directly.
For example, set a Trigger Rule to show the Lightbox when the visitor's about to leave the page and/or when they've scrolled down a certain percentage of the page.
Note: To ensure the optimal visitor experience, additional Trigger Rules won't show the Lightbox again if the visitor's already seen it by clicking the link.
14
Target your content page
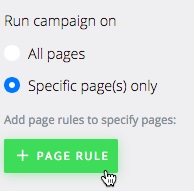
Remember, a content upgrade often relates to one or more specific content pages where it has high relevance to the content on the page. You'll therefore need to target the campaign to these page(s).
To do so, click the Targeting tab. Choose the Specific page(s) only option, and click the + Page Rule button.
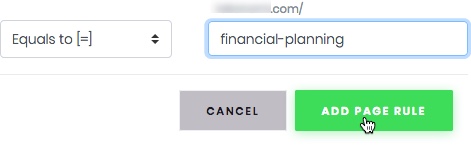
Select the Equals to [=] option, and enter the page URL (minus your domain name). Click Add Page Rule. Repeat for any additional pages.
To maximize lead conversions, leave the Device and Visitor Characteristics settings as they are.
15
Use Smart Campaigns
As soon as a visitor converts to a lead by requesting the content upgrade, you can run Smart Campaigns to further engage them and build your relationship.
For example, you might want to stop all other content upgrade campaigns, and instead run campaigns that offer a whitepaper or a sales webinar.
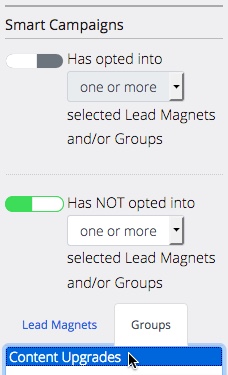
You'll find the Smart Campaigns settings at the bottom of the Targeting tab.
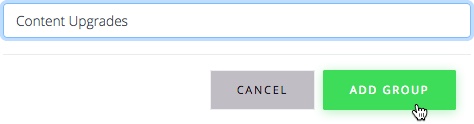
Turn on the Has NOT opted into... option, and choose the Group name you added in Step 03 above (for example, 'Content Upgrades') from the Groups tab.
This means that this content upgrade campaign (along with other campaigns in the same Group) will only run until you've converted the visitor into a lead via one campaign in the Group. They then all stop running.
Running follow-on Smart Campaigns for new leads, replacing your content upgrade campaigns, is simple.
To do so, add a new campaign, and this time turn the Has opted into... option on within the Smart Campaigns section. Select the same Group as before.
The new campaign will now start running for new content upgrade leads, instead of your content upgrade campaigns.
16
Make live!
Save your content upgrade campaign. Toggle the switch to live to start it running on your website.
You can make changes and update your campaign at any time.


17
Add More Campaigns
You may want to test whether adding one or more additional campaigns to the same page will help attract more leads who want to get your content upgrade.
For example:
- Add an inline Widget to the page such as right at the end and/or inline within the post.
- Add a Smartbar at the top or bottom of the page. You can make it 'sticky' so they continue seeing the offer even as they scroll.
If adding additional campaigns, note that if the visitor provides their details through say a Widget or Smartbar, the Lightbox for the same Lead Magnet will no longer be triggered by any Trigger Rule other than if they click a relevant link (see Step 12 above).
Power Step
Start Testing
Split testing your content upgrade campaigns can double or more the number of leads you receive with the same amount of traffic.
Even better, it's very quick to set up a test.
To do so, edit the campaign, and click the button to add a variation.
Change an aspect of the variation campaign, such as the headline, styling or whatever else you want to test.
Save the variation and click the button to start the test.
The stats page for the campaign will start showing which version of your campaign is attracting the highest lead conversions.
Once you have a winner, you can choose to continue running that version, and create a new variation to start testing.


Need Further Help?
Contact us at support@optinopoli.com